
Introduction to ESP32 and Home Lighting Automation
What is ESP32?
The ESP32 is a versatile microcontroller known for its built-in Wi-Fi and Bluetooth capabilities. It’s a small, affordable chip designed to empower developers and hobbyists to create smart devices easily. Whether you’re building a sensor network, a smart home gadget, or even a wearable, the ESP32 offers the processing power and connectivity needed for modern projects. Its popularity stems from the blend of a powerful MCU and wireless radios all packed into one neat package.
Benefits of Automating Home Lighting
Automating your home lighting with the ESP32 brings convenience, energy savings, and enhanced ambiance at your fingertips. Imagine walking into rooms that light up automatically based on your presence or scheduled timers. Beyond comfort, automated lighting ensures you never waste electricity on lights left on by accident. Plus, the ability to control your lights remotely means you can simulate occupancy even when you’re away, enhancing your home’s security. It’s a modern upgrade that quickly changes how you interact with everyday spaces.
Essential Components for ESP32 Lighting Projects
Hardware Requirements
To get started with ESP32 home lighting automation, you’ll need a few key components. First and foremost is the ESP32 development board itself. Depending on your project’s complexity, you might choose the ESP32-DevKitC for general prototyping or more specialized boards like the ESP32-S3 when you need extra features like PSRAM for advanced applications. Alongside the board, you’ll require LEDs or smart bulbs, appropriate drivers or relays to safely switch your lighting load, and wiring that fits your home’s electrical setup. Don’t forget power supplies that can handle the current requirements of your whole system.
Software Tools and Libraries
Programming the ESP32 involves setting up a development environment. Many beginners find the Arduino IDE the easiest for quick learning and rapid prototyping due to its simplicity and extensive libraries. But for more advanced features such as secure boot, OTA updates, or real-time operating system support, the ESP-IDF framework is a stronger choice. Whichever route you take, make sure to install the ESP32 board package correctly and consider using libraries like WiFi.h for networking or FastLED for LED control to speed up your development process.
Step-by-Step Setup of ESP32 for Lighting Control
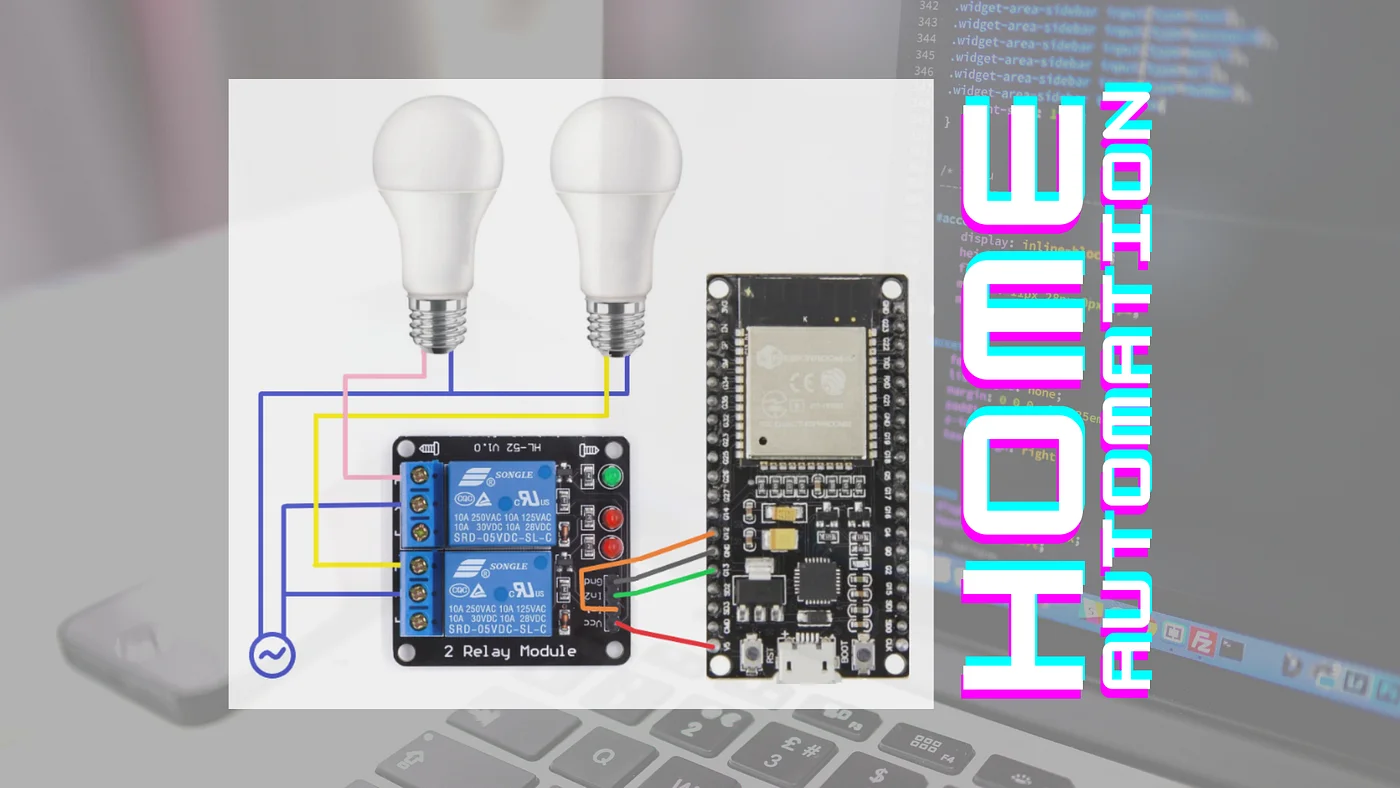
Connecting the ESP32 to Your Lighting System
Begin by safely wiring your ESP32 to the lighting components. Typically, you’ll connect the ESP32’s GPIO pins to a transistor or relay module that can handle the voltage and current of your lights. This separation is vital to protect your microcontroller from electrical surges. If you’re using LEDs directly, ensure you include appropriate resistors to prevent damage. Label your connections clearly and test power sources before integrating everything together to avoid any mishaps.
Programming Basics for Beginners
Once the hardware is in place, it’s time to write your first program. Start simple by toggling an LED on and off using basic digital write commands. This establishes communication between your code and the hardware. As you go deeper, introduce commands for Wi-Fi connectivity, allowing your ESP32 to be controlled remotely. Tutorials and example sketches are widely available and invaluable for this stage, making even complex tasks more approachable for newcomers.
Testing and Troubleshooting Your Setup
Testing is crucial in home automation projects. After uploading your program, monitor your ESP32’s responses. Use serial output logs to understand what your device is doing behind the scenes. Problems often arise from wiring errors, incorrect GPIO assignments, or power issues. Don’t be discouraged if something doesn’t work immediately—careful debugging, checking your connections, and consulting online forums usually lead to quick solutions.
Advanced Techniques to Enhance Your Lighting Automation
Integrating Sensors and Timers
To make your lighting truly smart, consider adding sensors like motion detectors, ambient light sensors, or timers. These components enable your system to react automatically to environmental changes. For example, motion sensors can trigger lights only when someone enters a room, while light sensors adjust brightness based on the time of day or natural light levels. Timers allow for scheduled lighting behavior, perfect for routines or energy savings. Combining these elements with your ESP32 opens up endless possibilities for automation.
Using Wi-Fi and Mobile Apps for Remote Control
One of the biggest advantages of the ESP32 is its wireless connectivity. With Wi-Fi enabled, you can control your lighting remotely through mobile apps or web interfaces. Many beginners use existing apps compatible with popular home automation platforms, while more advanced users can develop custom apps or integrate with voice assistants. This feature not only adds convenience but also security, letting you check and adjust your home lighting from anywhere in the world.
Energy Efficiency and Safety Considerations
Optimizing Power Usage
While the ESP32 chip itself can enter deep sleep modes to drastically reduce power consumption, this doesn’t always translate to low power use at the board level. Factors like voltage regulators and connected LEDs can increase consumption significantly. Design your circuits with energy efficiency in mind—select low-power components, and size your regulators and bulk capacitors correctly to handle current peaks. Avoid common pitfalls like assuming deep sleep current matches what you measure on the board without further optimization.
Ensuring Electrical Safety
When working with home lighting, safety is paramount. Always use properly rated components, especially when switching AC loads. If you’re unfamiliar with mains wiring, consider using low-voltage LED strips or smart bulbs that plug into existing fixtures instead. Implementing optocouplers or relays isolates your ESP32 from high voltages, protecting both the device and yourself. Take the time to follow local electrical codes and use appropriate enclosures for your electronics to prevent accidents.
Conclusion and Next Steps
Expanding Your Home Automation Projects
Once you master automating lighting with the ESP32, the sky’s the limit. You can branch out into controlling other systems like HVAC, security cameras, or even garden irrigation. The knowledge you’ve gained about hardware interfacing, wireless communication, and energy management will serve as a strong foundation. Remember to plan your components carefully, validate your designs before scaling, and continually explore new software libraries and frameworks to keep your smart home evolving.


