
Introduction to Arduino Home Security Systems
Creating your own home security alarm with Arduino is an exciting and practical project that combines technology with safety. Whether you want to safeguard your home against potential intruders or simply monitor unexpected movement indoors, an Arduino-based security system offers a customizable and cost-effective solution. With the right sensors and coding, you can build a device that not only detects motion but also alerts you in real time.
As concerns over unauthorized entry and unexpected activity increase, many enthusiasts and homeowners are turning to DIY electronics to enhance home security. Arduino, known for its versatility and ease of use, allows you to integrate different sensors and outputs efficiently. This step-by-step guide will walk you through everything you need to know, from components selection to coding and testing, making the process approachable even if you’re new to electronics.
Essential Components for Your Arduino Alarm
Choosing the Right Arduino Board
Picking the right Arduino board is foundational. For a home security alarm with multiple sensors and outputs, the Arduino Mega 2560 stands out. Its numerous input/output pins provide ample room for connecting PIR motion sensors, magnetic door switches, buzzers, relays, and even an LCD display. This flexibility allows you to expand your system as needed without worrying about pin limitations.
The Arduino Mega 2560 also supports communication protocols like I2C, making it easy to interface with various modules. Its stability and widespread community support make it ideal for both beginners and advanced users aiming to build a reliable alarm system.
Motion Sensors Compatible with Arduino
Motion detection is key to alerting you about unexpected activity. Passive Infrared (PIR) sensors are commonly used with Arduino. These sensors detect changes in infrared radiation caused by movement, making them perfect for indoor monitoring. They’re simple to install and don’t require complex calibration.
Magnetic door switches are another practical addition, letting you monitor whether doors or windows are opened without authorization. Combining multiple sensor types enhances your system’s reliability and gives you comprehensive coverage.
Additional Hardware and Tools Needed
Besides sensors and the Arduino board, other components play important roles. An LCD display helps by providing real-time status updates like “System Armed” or “Motion Detected,” giving immediate feedback right on the device. Buzzers act as audible alarms to warn intruders or notify you instantly. Relay modules allow you to control higher voltage devices like external sirens or lights.
IoT sensors and wireless modules add another layer by enabling remote monitoring and control using your smartphone or computer. This capability is especially useful if you want to receive alerts when you’re away from home.
Designing the Security Alarm Circuit
Connecting the Motion Sensor
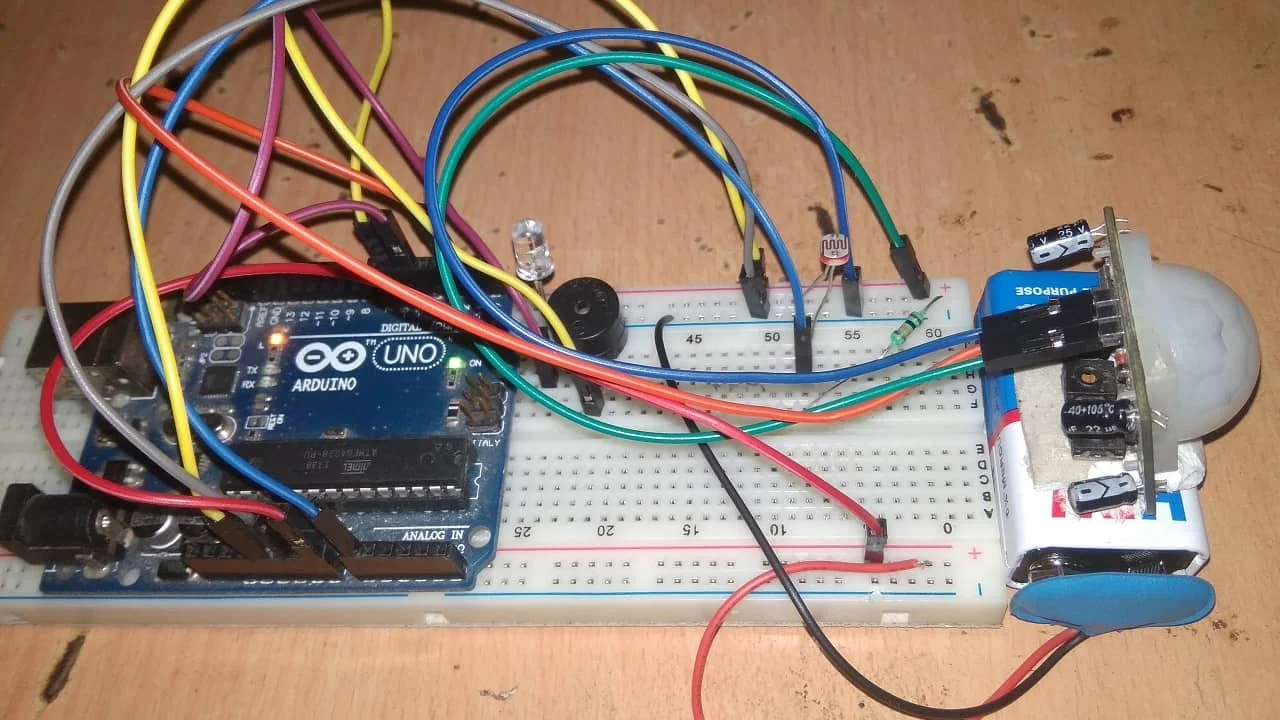
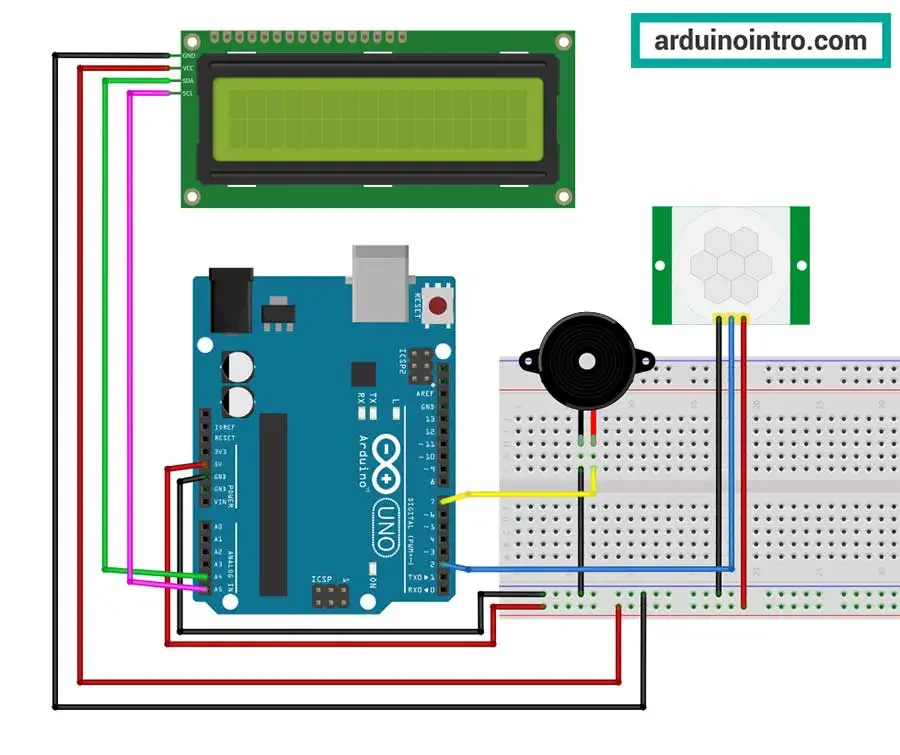
Correct wiring is essential for reliability. When connecting PIR sensors to the Arduino Mega 2560, it’s best to secure them to digital input pins to ensure consistent detection. Make sure the power and ground lines are properly connected to avoid sensor malfunctions. Also, position the sensors strategically to cover main entrances, hallways, or important rooms.
Creating a detailed circuit diagram before assembly can save time and prevent errors. This visual plan helps you understand the connections clearly and troubleshoot more effectively.
Integrating the Alarm Output (Buzzer/LED)
The alarm output is your system’s voice. Attaching a buzzer to a digital output pin enables the Arduino to sound an alert whenever motion is detected or a door is opened. Adding an LED alongside the buzzer gives a visual indicator for system status or triggered alarms.
Using a relay module allows you to control larger devices such as sirens or lights that operate on higher voltage. Be sure to follow safety guidelines when working with mains electricity or high-power devices to protect yourself and your equipment.
Power Supply Considerations
Powering your Arduino system reliably ensures continuous monitoring. The Arduino Mega 2560 can be powered through USB or an external power supply, depending on your setup. For permanent installations, using an external adapter ensures stable operation without dependence on a computer connection.
If you’re integrating multiple sensors and output devices, consider the total current draw to avoid overloading the board’s regulator. Sometimes using a dedicated power supply for sensors or alarms can maintain system stability.
Coding the Arduino for Motion Detection
Writing Sensor Input Logic
The core of your security system is the code that reads sensor inputs. Start by programming the Arduino to continuously monitor the PIR motion sensors and magnetic door switches. When a sensor changes state, your program should react accordingly. Setting clear thresholds and debounce logic will help avoid false triggers caused by minor environmental changes or electrical noise.
Writing clean and well-commented code makes it easier to tweak sensor sensitivity and behavior as you test the system.
Programming the Alarm Trigger
Once the Arduino detects motion or a door opening, it should trigger the alarm outputs immediately. This means turning on the buzzer and LED or activating a relay connected to an external siren or light. Your program can also update the LCD display with messages signaling the alarm state.
Ensure your code handles multiple sensors gracefully, so that the alarm responds correctly regardless of which sensor is triggered.
Adding Delay and Reset Functions
To improve usability, add delay and reset functions to your code. For example, once the alarm sounds, it could stay active for a preset period before automatically resetting to standby mode. This prevents the alarm from sounding indefinitely and allows you time to disarm or inspect.
Include manual or automatic reset options, so the system can be rearmed easily after an alarm event. This adds a layer of control for everyday use.
Building and Testing Your Prototype
Step-by-Step Assembly Instructions
After planning, it’s time to assemble your system. Begin by constructing your model house or using a test environment to simulate a real home. Connect the sensors in the designated positions, ensuring secure and neat wiring. Attach the buzzer, LCD, and relay modules following your circuit schematic.
Upload your code to the Arduino Mega 2560 and power up the system. Observe the LCD screen for status updates and test sensor responses by simulating movement or opening doors. This hands-on approach helps you catch issues early.
Troubleshooting Common Issues
During testing, you might encounter some challenges. One frequent mistake is skipping the circuit diagram, which often leads to miswiring and unreliable detection. Double-check connections and secure wires firmly to prevent intermittent failures.
If sensors fail to trigger alarms consistently, revisit your code logic and ensure sensor pins are correctly identified. Also, verify the positioning of motion sensors in relation to possible heat sources or obstacles that could cause false readings.
Finally, test the system multiple times in varied conditions to confirm robustness before any full deployment.
Expanding Your Security System
Adding Remote Notifications
One of the most powerful upgrades is integrating IoT sensors or wireless modules, allowing you to receive alerts on your smartphone or computer no matter where you are. By connecting your Arduino to a Wi-Fi or GSM module, you can program it to send push notifications or emails when the alarm is triggered.
This remote monitoring feature is invaluable for homeowners who travel or want constant peace of mind. Setting up such capabilities might require additional coding and configuration but offers a major boost in functionality.
Integrating Multiple Sensors
To build a comprehensive security alarm, consider combining various sensor types. Alongside PIR and magnetic switches, you can add glass break detectors, smoke sensors, or even cameras if you expand to more advanced microcontrollers or connected devices.
By integrating multiple sensors, you reduce blind spots and improve system accuracy. The Arduino Mega 2560’s ample input pins make it well-suited for managing multiple inputs simultaneously, ensuring your home security system grows with your needs.


