
Introduction to Social Media Automation
Why Automate Social Media Posting?
Managing social media accounts manually has become increasingly challenging due to the sheer volume of tasks involved. From handling a flood of LinkedIn messages to ensuring that fresh content reaches audiences across multiple platforms, social media managers often feel overwhelmed. This burden is compounded by the constant need to keep posts engaging and timely, while also tracking performance metrics, which can be complex and time-consuming. Without automation, repetitive tasks such as posting updates, monitoring conversations, and researching hashtags can consume valuable time and effort that could be better used for strategic engagement.
Benefits of Using Chrome Extensions
Chrome extensions offer a practical solution to streamline social media management. By automating routine activities, these tools reduce clutter and help organize workflows effectively. Extensions like Buffer simplify scheduling and performance tracking, while others like Grammarly ensure the content remains polished and professional. The convenience of managing multiple accounts from a single interface enhances productivity and decreases the likelihood of missed opportunities. Moreover, security-focused extensions such as LastPass help manage login credentials safely, reducing risks associated with multiple accounts. Overall, Chrome extensions provide an accessible, easy-to-integrate way to boost efficiency and maintain quality across social platforms.
Choosing the Right Chrome Extension for Social Media Automation
Top Chrome Extensions Overview
With various Chrome extensions available, selecting the right ones can be daunting. Buffer is a popular choice for streamlined content scheduling and comprehensive analytics. Grammarly supports real-time grammar and tone checks, essential for maintaining a consistent brand voice. For hashtag optimization, RiteTag offers instant, data-driven suggestions to maximize post visibility. Canva facilitates quick graphic creation using templates, maintaining brand consistency without needing advanced design skills. Additionally, extensions like LastPass secure passwords, and Zapier connects multiple apps to automate workflows without coding. Tools such as Kondo help organize LinkedIn inboxes with labels and reminders, while vidIQ Vision delivers YouTube analytics and competitive insights directly within the browser.
Key Features to Consider
When choosing extensions, it is essential to prioritize usability and integration capabilities with your existing social media platforms. Look for features like multi-account support, real-time notifications, and customizable scheduling options. Security is another critical aspect—extensions must protect your login details and personal information. Automation flexibility is valuable, allowing you to tailor workflows to specific needs, such as cross-posting different content types or setting alerts for community engagement. Equally important is the availability of analytics dashboards, enabling you to monitor and adjust your social media strategy based on performance metrics.
Setting Up Your Chrome Extension for Automation
Installing the Extension
Before installing, ensure you have active accounts on your target social media platforms and a basic understanding of how Chrome extensions work. Search for your chosen extension in the Chrome Web Store and verify that it is reputable by checking user reviews and ratings. After installation, grant the necessary permissions cautiously, ensuring that access aligns with the extension’s purpose. Avoid extensions requesting excessive privileges to mitigate security risks. Once installed, the extension icon usually appears near the browser’s address bar for easy access.
Configuring Initial Settings
After installation, configuring the extension is crucial for optimal automation. Begin by linking your social media or community accounts securely. Follow prompts to authorize access, and review any privacy policies to understand data usage. Next, customize scheduling preferences such as preferred posting times and frequency based on your audience’s engagement patterns. Set up alerts for comments or messages to stay responsive while reducing manual monitoring. Finally, explore available templates or automation workflows to automate repetitive tasks like sharing new blog posts or updating status messages. Initial configuration sets the foundation for effective and efficient automation.
Step-by-Step Process to Schedule and Automate Posts
Connecting Your Social Media Accounts
Start by securely connecting your social media profiles to the extension. This process usually involves logging into each account via the extension interface and granting the necessary permissions. Connecting all relevant accounts in one place consolidates management, saving time and reducing the chance of overlooked updates. Be mindful of security warnings and use tools like LastPass to manage strong passwords across platforms, avoiding the risk of account breaches.
Creating and Uploading Content
Once accounts are linked, focus on creating engaging and platform-appropriate content. Use graphic design tools like Canva to produce visually appealing images that maintain brand consistency. Meanwhile, tools such as Grammarly help refine captions and texts for professionalism. Upload the content directly within the extension or link it from your content library. Tailoring content for each social media platform enhances relevance and avoids appearing generic, which can hurt engagement. Avoid bulk uploading without checks to maintain quality across posts.
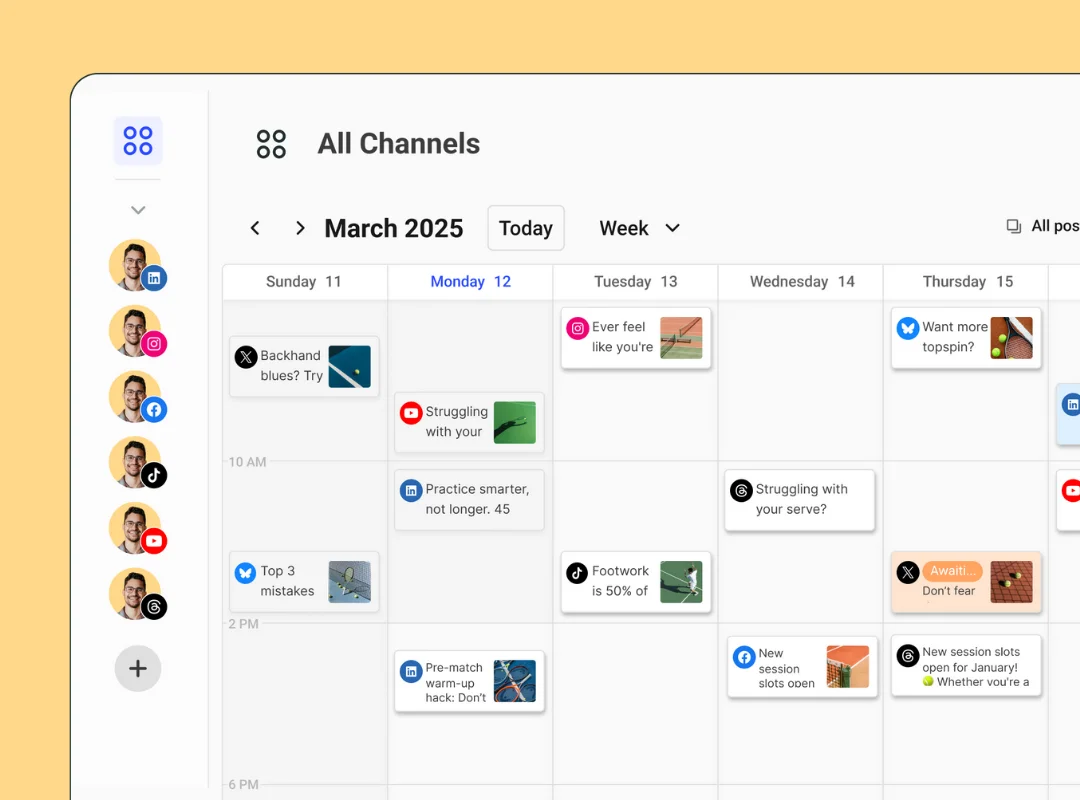
Scheduling Posts Automatically
After content preparation, use the scheduling features to set posting times aligned with your audience’s most active periods. Automation tools like Buffer allow you to queue posts across multiple accounts, ensuring a steady flow of content without manual intervention. Monitor the schedule to prevent duplicate or irrelevant posts. Automated scheduling should be reviewed regularly so you can adjust timing and content based on ongoing engagement insights. This dynamic approach avoids the pitfall of static automation that can lead to disengagement or rule violations in communities.
Tips to Maximize Efficiency with Automation Tools
Best Posting Times and Frequency
Maximizing reach requires posting when your target audience is most active. Many automation tools provide data on optimal posting times tailored to your accounts. Balancing frequency is important—too many posts can overwhelm followers, while too few may reduce visibility. Adjust scheduling based on each platform’s culture and user habits. Consistency matters, but be prepared to iterate as you gather more engagement data.
Monitoring and Adjusting Scheduled Posts
Automation is not a set-it-and-forget-it solution. Regularly monitoring engagement metrics helps identify which posts resonate and which need modification. Tools integrated within Chrome extensions often offer dashboards for tracking likes, comments, shares, and reach. Use these insights to refine your content strategy and automation settings. Avoid relying solely on automation—active participation through personal engagement strengthens community connections and builds trust. Always review community guidelines before automating posts to stay compliant and transparent about your use of automation tools.


