
Introduction to Arduino-Based Home Automation
What is Home Automation?
Home automation involves using technology to control household systems and devices, often remotely. It enhances convenience, security, and energy efficiency by automating lighting, temperature, appliance control, and security systems. Instead of manual operations, automation allows these tasks to be handled automatically or through smartphone apps.
Why Choose Arduino for DIY Projects?
Arduino is an affordable and versatile microcontroller platform ideal for beginners. It offers real-time control over sensors and actuators, allowing flexible customization for varied home automation needs. Unlike commercial systems with fixed features and high costs, Arduino-based projects empower users to create tailored solutions. The vast online community and abundant tutorials make learning and troubleshooting accessible. Its low power consumption and robust operation make it suitable for sensor nodes and remote components.
Essential Components Needed
Arduino Board Selection
The Arduino Uno Rev3 is a popular choice for beginners due to its ease of use and compatibility with many sensors. It provides sufficient input/output pins and processing power to manage basic home automation setups. For more advanced projects, other Arduino variants or Raspberry Pi can be considered depending on complexity and the need for centralized data processing.
Common Sensors and Actuators
Key sensors include PIR motion detectors for presence sensing, temperature sensors for climate control, LDR sensors for light detection, ultrasonic sensors for proximity measurements, and IR sensors for remote input. Actuators often involve LEDs for indicators, relays for switching high-voltage devices, and servo motors for mechanical movements like automatic gates. Each sensor and actuator plays a crucial role in automating different household functions.
Additional Hardware and Tools
Besides sensors and the Arduino board, essential hardware includes jumper wires, breadboards, and power supplies. Proper tools such as soldering irons, digital multimeters, and wire strippers are necessary for reliable assembly and safety. Using quality components from reputable suppliers ensures durability and minimizes hazards during operation.
Planning Your Home Automation System
Identifying Automation Goals
Start by listing routine tasks that could benefit from automation, such as lighting control, temperature regulation, security monitoring, or energy management. Observing daily habits helps prioritize which devices to include. Clear objectives guide component selection and system design, preventing unnecessary complexity.
Designing the System Layout
Sketching a system architecture illustrates how sensors, controllers, actuators, and communication modules connect. Defining signal pathways and control logic upfront helps avoid pin conflicts and wiring errors. This planning phase also includes assigning pins on the Arduino and ensuring compatible hardware interfaces.
Estimating Budget and Time
Calculate costs for components, tools, and potential replacements. Allocate time for learning, assembly, coding, and testing. Careful budgeting helps avoid low-quality parts that often fail prematurely, elevating safety risks and debugging challenges. Realistic timeframes prevent rushed builds that might compromise reliability.
Step-by-Step Assembly Guide
Setting Up the Arduino Environment
Install the Arduino IDE on a Windows 10 system to start programming. The IDE supports code writing, compiling, and uploading to the Arduino board via USB. Familiarize yourself with the interface and basic sketch structure before hardware integration.
Wiring Sensors and Actuators
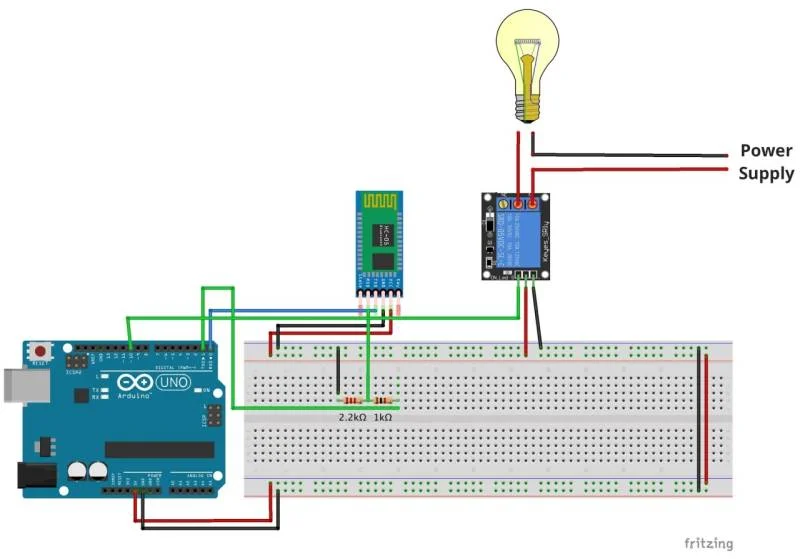
Connect each sensor and actuator to designated Arduino pins based on the system layout. For example, PIR motion sensors connect to input pins, relays to output pins, and communication modules like HC-05 Bluetooth require serial communication pins. Ensuring proper pin modes using pinMode() in setup() prevents conflicts.
Uploading Basic Control Code
Begin with simple sketches that read sensor data and control actuators accordingly. For instance, use a PIR sensor to switch an LED on motion detection or a temperature sensor to activate a relay when exceeding 44°C. Regular use of Serial.print() aids in monitoring sensor values and verifying control flow.
Programming Tips for Beginners
Understanding Arduino IDE
The Arduino IDE uses C/C++ based syntax with specific functions like setup() for initialization and loop() for continuous execution. Setting appropriate pin modes and using conditional statements allow responsive device control. Familiarity with the IDE streamlines programming and debugging steps.
Writing Simple Control Programs
Start with straightforward logic such as turning LEDs on or off based on sensor thresholds. Gradually integrate more devices, ensuring each new sensor or actuator is tested independently. Introducing delays in the main loop stabilizes sensor readings and prevents erratic switching.
Debugging Common Issues
Use Serial.print debugging to verify sensor outputs and device states. Watch for common pitfalls like assigning the same pin as both input and output, which causes conflicts. Avoid leaving commented out legacy code that can confuse debugging. Implement input filtering or debouncing to reduce false triggers.
Expanding and Customizing Your System
Adding Wireless Connectivity
Integrate modules such as HC-05 Bluetooth to enable remote control. Receiving commands allows turning devices on and off without physical interaction. However, ensure commands are correctly read and parsed; for example, comparing string commands requires reading multiple characters, not single bytes.
Integrating Voice Control

For advanced customization, connect the Arduino to a Raspberry Pi running voice recognition software or home automation platforms like Home Assistant. This setup enables voice commands to trigger actions, enhancing user interaction with the system.
Enhancing Security Features
Add multiple sensors such as ultrasonic proximity and IR detectors to monitor doors and windows. Program alerts or alarms when unusual activity is detected. Use relays and servo motors to control locks or gates automatically, improving home security.
Maintenance and Troubleshooting
Regular System Checks
Periodically inspect wiring connections, sensor functionality, and actuator responsiveness. Use digital multimeters and oscilloscopes if needed to diagnose electrical issues. Keep spare parts on hand to replace faulty components promptly.
Solving Sensor and Connectivity Problems
Address false sensor triggers by adding software debouncing or hardware filters. Check Bluetooth module pairing and signal strength for communication errors. Avoid using cheap, unreliable components as they often cause unpredictable failures and pose safety risks.
Conclusion: Benefits and Next Steps
Building a DIY Arduino-based home automation system offers an affordable, customizable way to enhance daily living. It provides hands-on learning and control over household devices without relying on costly commercial solutions. With careful planning, quality components, and incremental learning, beginners can develop reliable automated environments. Moving forward, exploring integration with advanced platforms and expanding functionalities can transform simple projects into robust smart homes.


