
Introduction to Battery-Powered ESP32 Weather Stations
What is an ESP32 and Why Use It?
The ESP32 is a versatile microcontroller with integrated Wi-Fi and Bluetooth capabilities. It is widely favored in DIY electronics for its robust performance and connectivity options. This combination makes it ideal for developing weather stations that require real-time data transmission over wireless networks.
Its low power consumption modes and sufficient processing power allow seamless interaction with multiple sensors, making the ESP32 the core of many smart environmental monitoring systems.
Benefits of Battery Operation for Weather Stations
Using batteries grants weather stations the advantage of portability and deployment in locations without access to mains power. Battery operation also supports installation in remote or hard-to-reach places, expanding where environmental data can be collected.
Moreover, coupling battery power with solar energy harvesting enables extended autonomous operation. This reduces maintenance intervals and enhances sustainability by relying on renewable energy sources to recharge the battery.
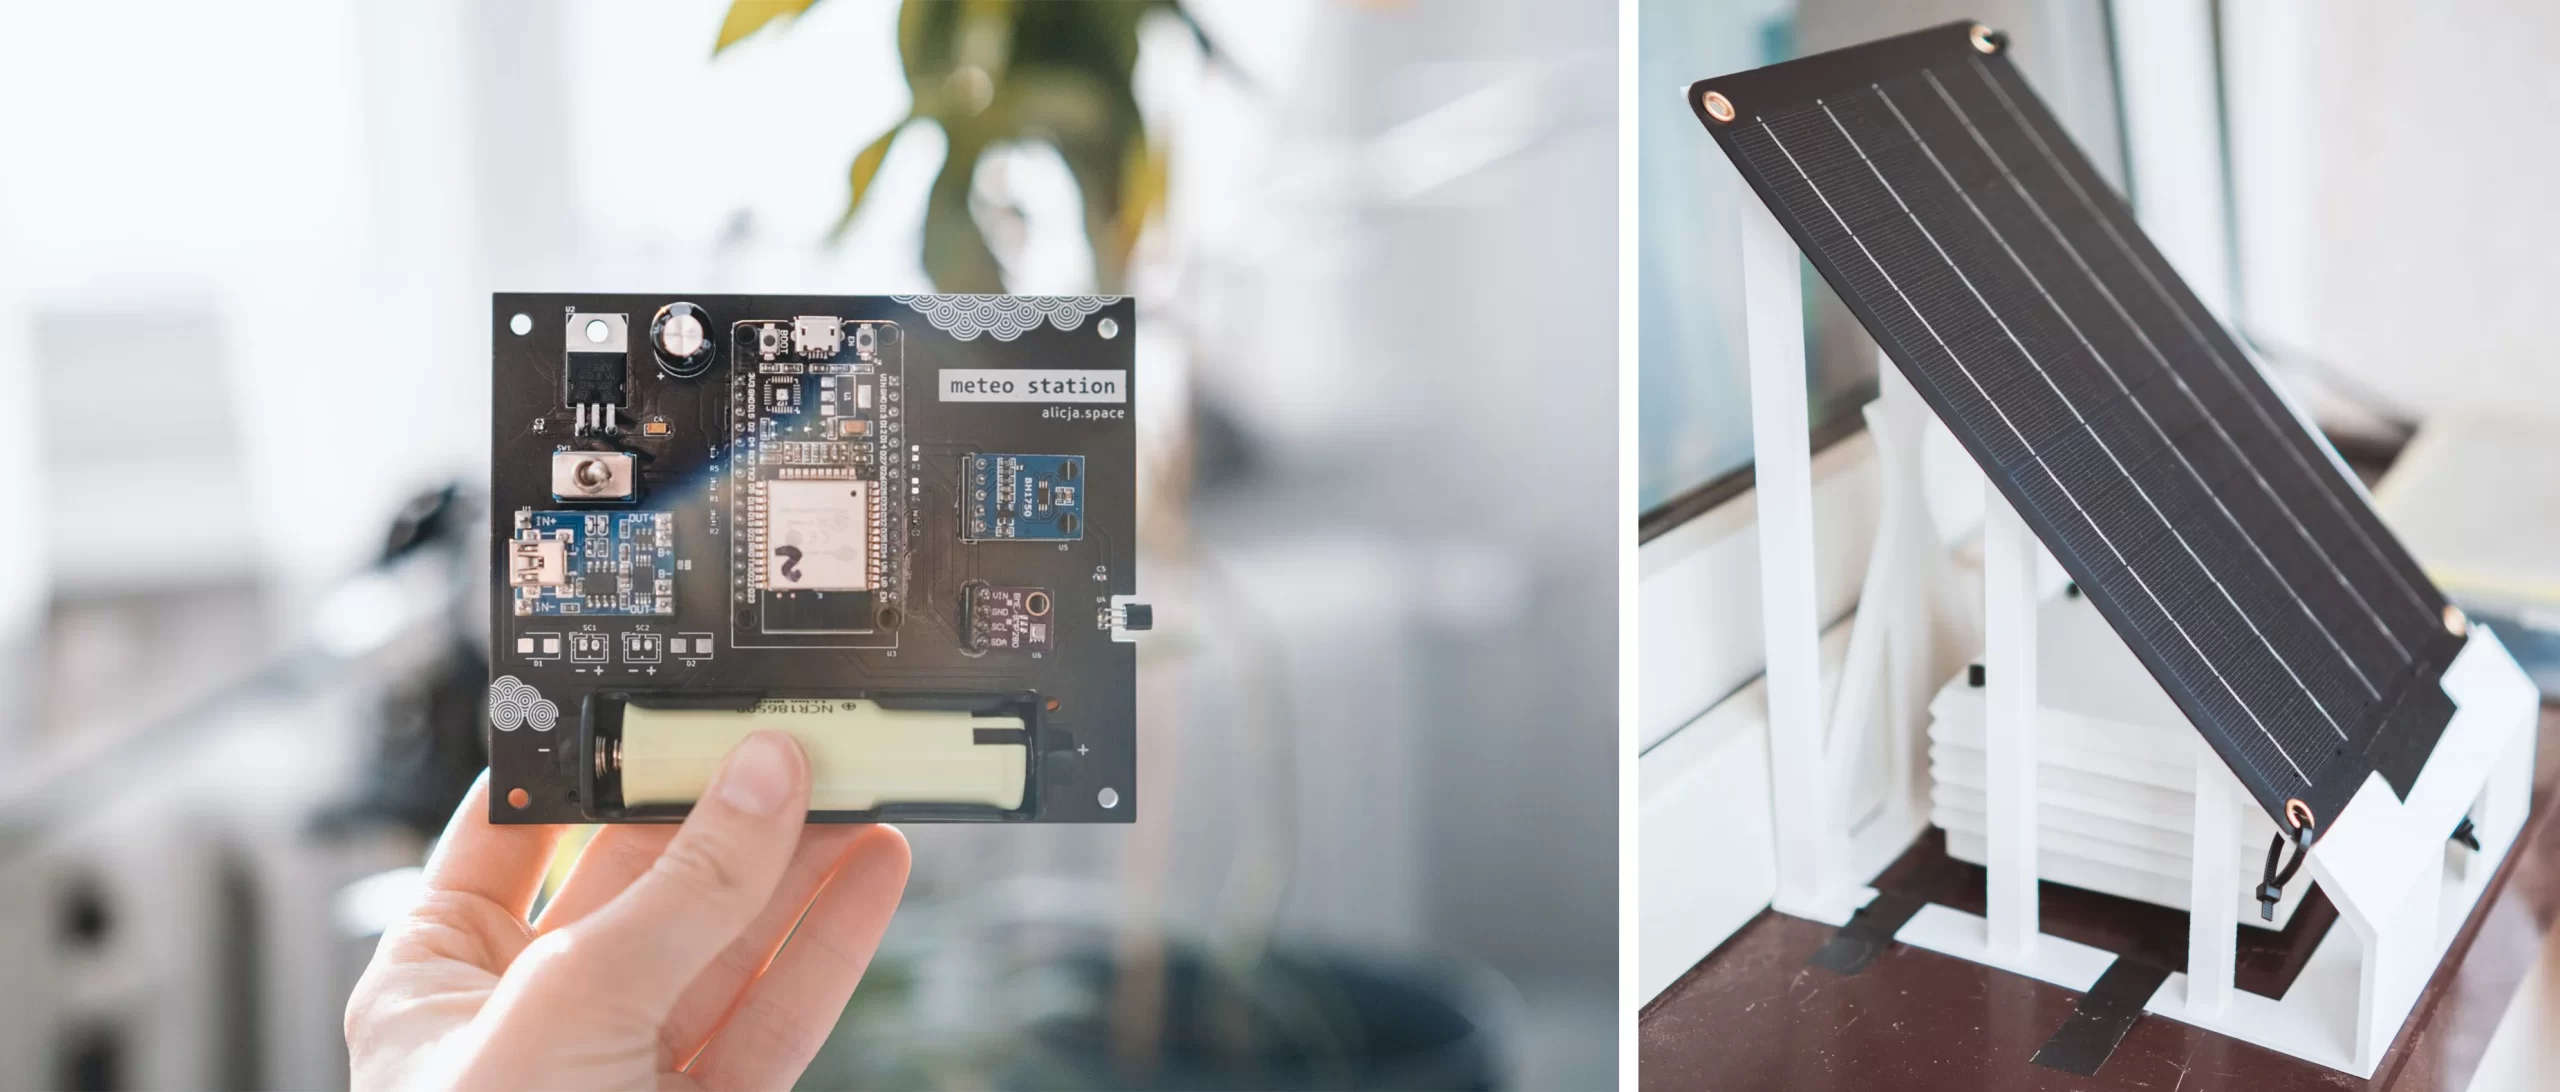
Core Components Overview
Selecting Sensors for Weather Data Collection
Choosing appropriate sensors is crucial for accurate weather data. Sensors like the BME280 offer combined temperature, humidity, and atmospheric pressure readings, simplifying wiring and data handling.
It is important to ensure each sensor’s I2C address is unique if multiple sensors share the same bus. Failure to manage address conflicts can disrupt communication, causing erroneous or missing data.
Choosing the Right Battery and Solar Panel
The battery should provide sufficient capacity to keep the system running during low sunlight periods. Lithium-ion or LiPo batteries are popular choices for their energy density and rechargeability.
Integrating a solar panel with an onboard protection circuit simplifies connection and prevents issues like reversed current flow that could damage cells. Schottky diodes are an alternative for blocking reverse currents and improving conduction under shading conditions.
ESP32 Power Management Essentials
Power management is key to system stability. The ESP32’s startup requires a surge of current, which can be smoothed using large electrolytic capacitors on the power lines. Decoupling capacitors near the voltage regulator help filter noise, improving reliability.
To monitor battery health, incorporating a voltage divider circuit allows the microcontroller to measure battery voltage accurately, assisting in managing energy consumption and avoiding unexpected shutdowns.
Designing the Weather Station System
Circuit Design and Connections
The system should be structured for modularity and ease of maintenance. Using goldpin connectors on the PCB enables swapping or upgrading sensors without extensive rewiring. Proper soldering—especially of connectors and diodes—ensures reliable electrical contacts.

Careful layout to separate power and signal lines reduces noise, critical for sensor accuracy. Incorporating pull-up resistors on data lines like DS18B20 and I2C can prevent communication issues.
Integrating Solar Charging and Battery Monitoring
Linking the solar panel and battery through a charge controller allows safe charging cycles and prevents overcharging or deep discharge damage. Monitoring battery voltage provides insights into system charge state, enabling informed power management strategies.
Simplifying this setup using solar panels with integrated USB outputs and protection circuits can reduce component count and assembly complexity.
Enclosure Considerations for Outdoor Use
Weather stations exposed to the elements require protective enclosures. Applying a protective varnish such as PLASTIK 70 on exposed PCBs prevents moisture ingress and prolongs device longevity.
3D-printed Stevenson cages can shield sensors while minimizing interference with measurements. Likewise, solar panel holders designed through 3D printing maximize sunlight exposure and physical stability.
Programming the ESP32
Setting Up Arduino IDE or PlatformIO
Programming the ESP32 begins with installing the appropriate development environment. Both Arduino IDE and PlatformIO support this microcontroller, offering extensive libraries and community examples for sensor integration and Wi-Fi connectivity.
Proper inclusion of Wi-Fi credentials within the code is critical to enable network connections. Handling configuration securely and efficiently prevents connectivity failures.
Reading and Processing Sensor Data
At startup, the ESP32 should initialize sensors like the BME280 and verify their presence. Failure to detect sensors must be handled gracefully to avoid system hangs.
Sensor readings are processed and formatted for transmission. Using MQTT protocol, the data can be published to specific topics, ensuring remote accessibility with reliable delivery (QoS 1).
Implementing Power Saving Modes
To extend battery life, the ESP32 utilizes deep sleep modes, waking periodically to take measurements and transmit data. Timers and event handlers manage Wi-Fi reconnection and MQTT connectivity efficiently during wake cycles.
Ensuring serial outputs are flushed before deep sleep prevents loss of debugging information. Proper balance between data freshness and power saving is achieved by configuring precise timer wakeup intervals.
Deploying and Testing Your Station
Calibrating Sensors for Accuracy
Calibration is essential for trustworthy data. Comparing sensor outputs with known references and adjusting readings accordingly can improve precision. Regular checks maintain reliability over time.
Testing Solar Charging Efficiency
Testing should verify that the solar panel charges the battery effectively under different lighting conditions. Monitoring voltage and current inputs confirms the proper functioning of protection circuitry and overall charging performance.
Real-World Performance Monitoring
Once deployed, continuous monitoring helps identify issues arising from environmental conditions or hardware wear. Integration with local servers running InfluxDB and Grafana provides intuitive visualization and historical data analysis, enhancing system management.
Advanced Tips and Future Enhancements
Adding Wireless Data Logging and Alerts
Implementing local servers to store and visualize weather data can provide deeper insights. Alert systems using MQTT can notify users of significant weather changes or system battery warnings, improving responsiveness.
Expanding Sensor Array and Features
The modular nature of the PCB allows adding sensors for soil moisture, wind speed, or rainfall measurement. Software can be extended to accommodate more data types and refine power management strategies, increasing the station’s utility and versatility.


