
Introduction to Garden Irrigation Automation
Why Automate Your Garden Watering?
Imagine arriving home after a long day, only to find your garden thriving without you having to lift a finger. Automating your garden watering not only saves you time but also ensures your plants receive the exact amount of water they need. This reduces water waste and supports healthier plant growth. Whether you’re a busy professional or a gardening enthusiast, automated irrigation takes the guesswork out of watering schedules and can prevent common mistakes like overwatering or underwatering.
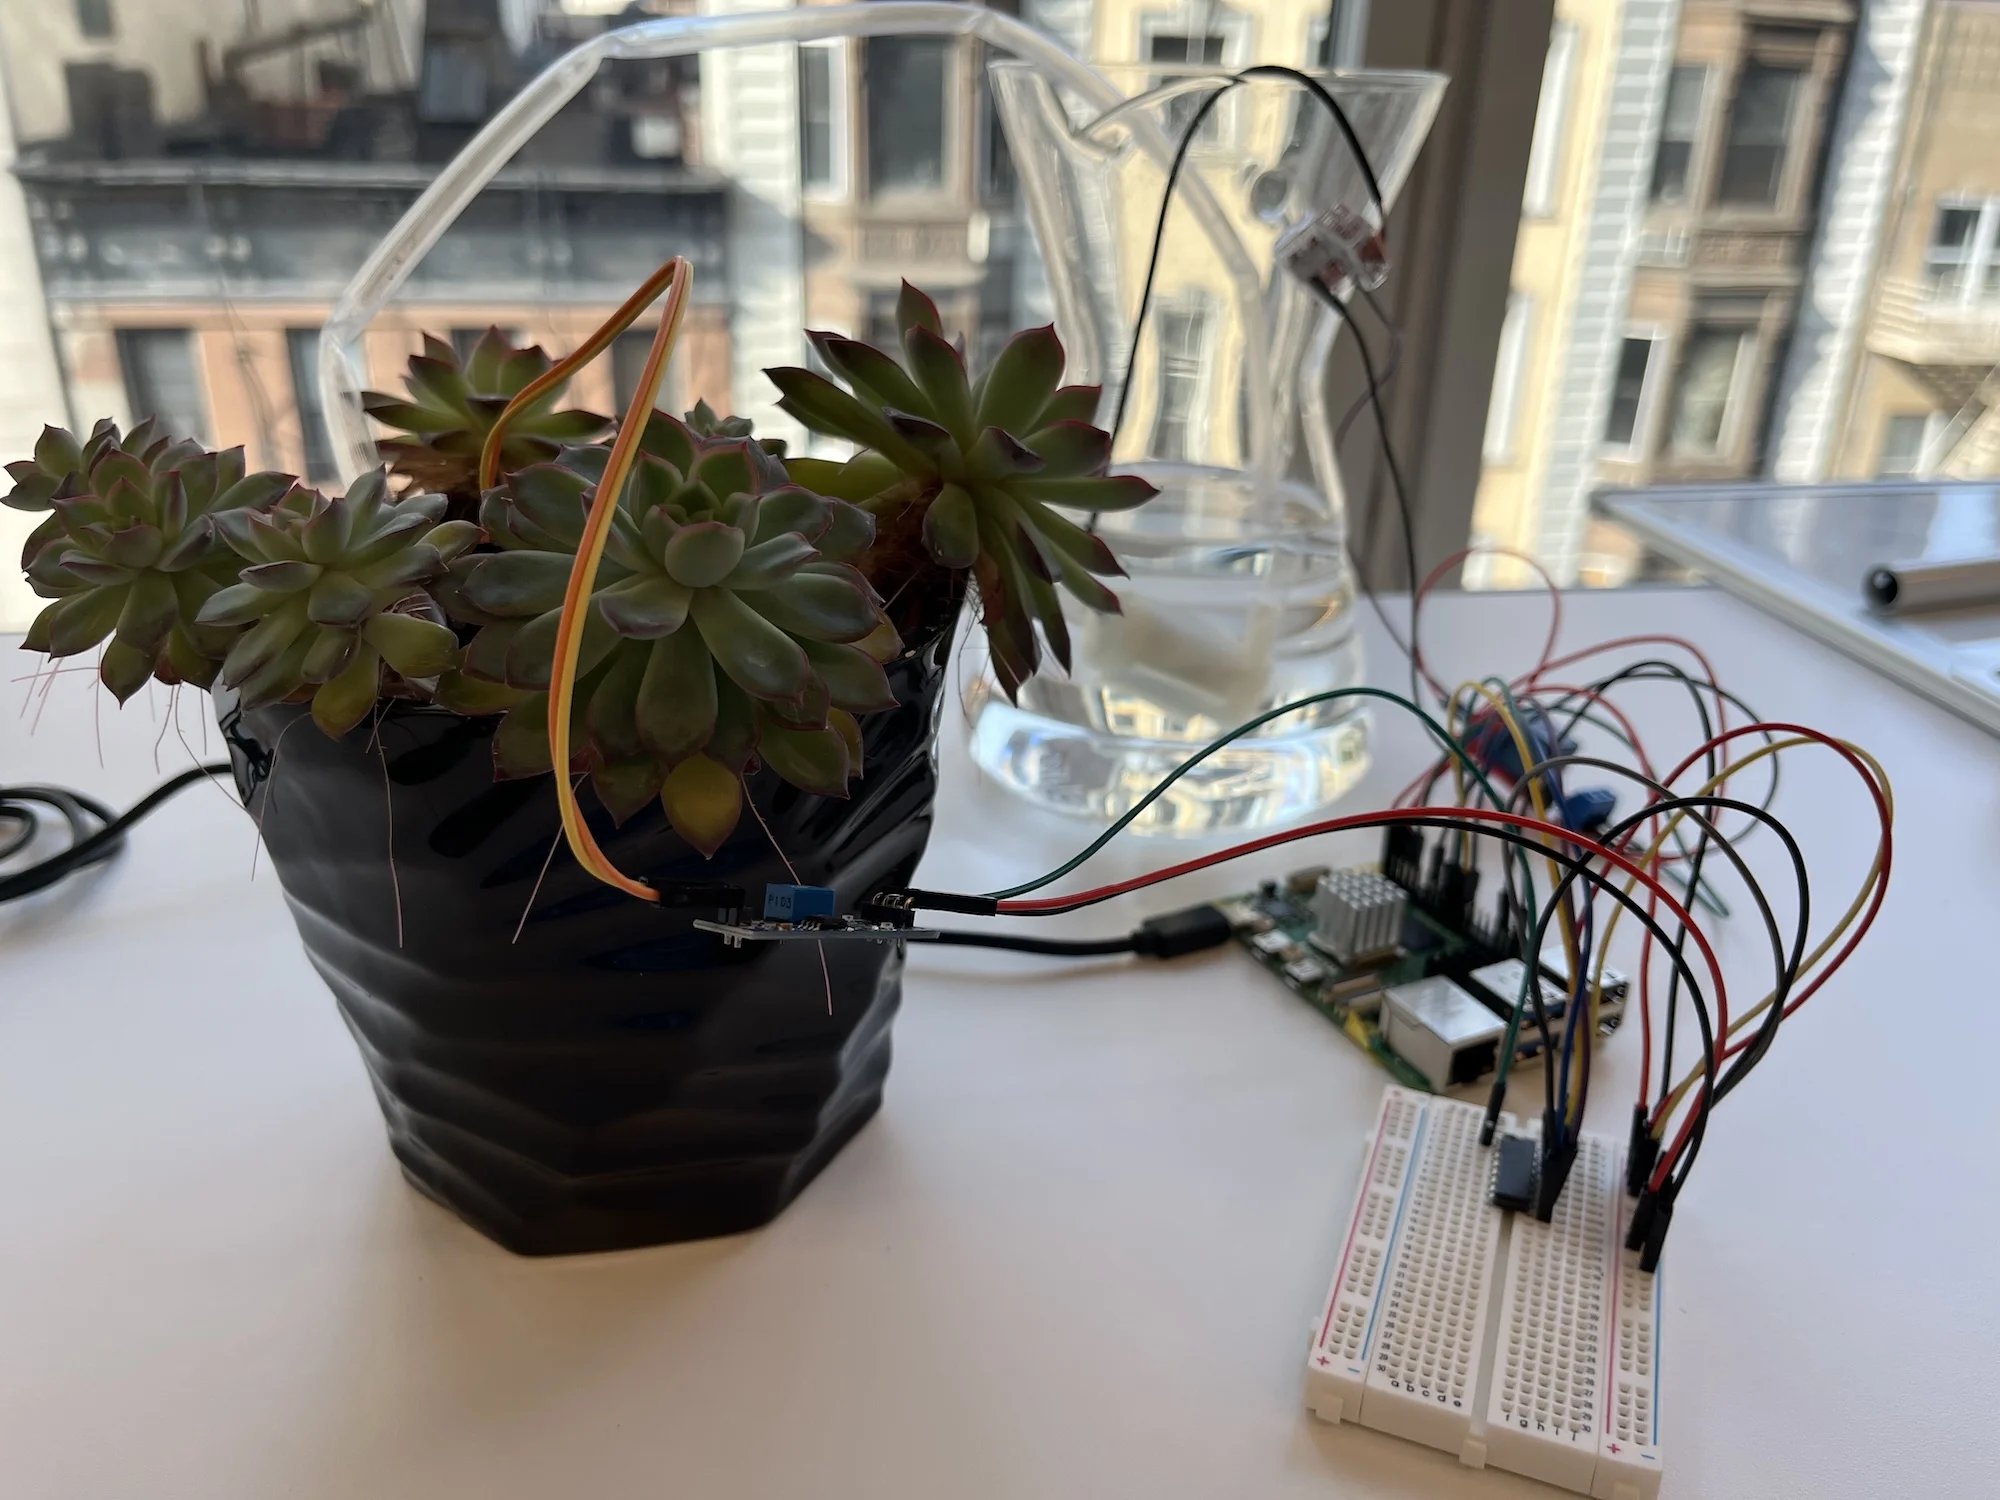
For instance, consider a home gardener who struggled to remember watering times while traveling. After setting up an automated system using a Raspberry Pi and soil moisture sensors, they noticed their plants were healthier, and their water bills decreased. This practical benefit is why more people are turning to smart irrigation solutions to simplify garden care and boost sustainability.
Overview of Raspberry Pi and Soil Moisture Sensors
The Raspberry Pi, a small yet powerful single-board computer, has become a popular choice for DIY home automation projects. Its flexibility and affordability make it ideal for integrating various sensors and controlling devices like water pumps. Soil moisture sensors are crucial components in an automated irrigation system as they provide real-time data on soil hydration levels. However, not all soil moisture sensors are created equal. For example, capacitive moisture sensors are known for their durability and resistance to soil mineral buildup, lasting longer in outdoor environments compared to cheaper resistive sensors that degrade quickly.
Because Raspberry Pi cannot directly read analog sensor signals, using an Analog-to-Digital Converter (ADC) like the MCP3008 becomes essential. This setup ensures accurate moisture readings, allowing the system to make smart watering decisions based on reliable data.
Planning Your Automated Irrigation System
Assessing Your Garden’s Water Needs
Before diving into the technical side, consider the specific watering needs of your garden. Different plants have varying moisture requirements, and factors such as soil type, local climate, and sun exposure play key roles. For instance, succulents require minimal watering, while vegetable patches typically need frequent hydration. Take time to observe your garden’s current watering routine and identify any patterns of dryness or excessive moisture.
Creating zones within your garden can make automation more efficient. By grouping plants with similar water needs, your system can deliver tailored watering schedules, avoiding overwatering sensitive plants or neglecting thirstier ones. Using moisture sensors in each zone provides localized data to guide irrigation precisely where it’s needed.
Selecting the Right Components: Raspberry Pi Models and Sensors
Choosing the right hardware sets the foundation for a successful irrigation system. The Raspberry Pi Zero W is a cost-effective option with built-in Wi-Fi, suitable for most garden automation projects. If you need more processing power or additional interfaces, models like Raspberry Pi 4 offer greater flexibility, but may require more power and enclosure considerations.
When selecting moisture sensors, investing in capacitive sensors pays off. They resist corrosion and maintain accuracy longer despite constant soil contact. Pairing these with an MCP3008 ADC module allows the Raspberry Pi to interpret their analog signals effectively. Additionally, consider temperature sensors like the DS18B20 to monitor environmental conditions, which can help optimize watering schedules further.
Don’t underestimate the importance of power management. It’s crucial to use a separate external power source for devices like pumps instead of powering them directly from the Raspberry Pi’s 5V pin, which risks hardware damage. Relays or MOSFET modules are recommended to safely control water pumps and valves.
Setting Up the Hardware
Wiring Soil Moisture Sensors to the Raspberry Pi
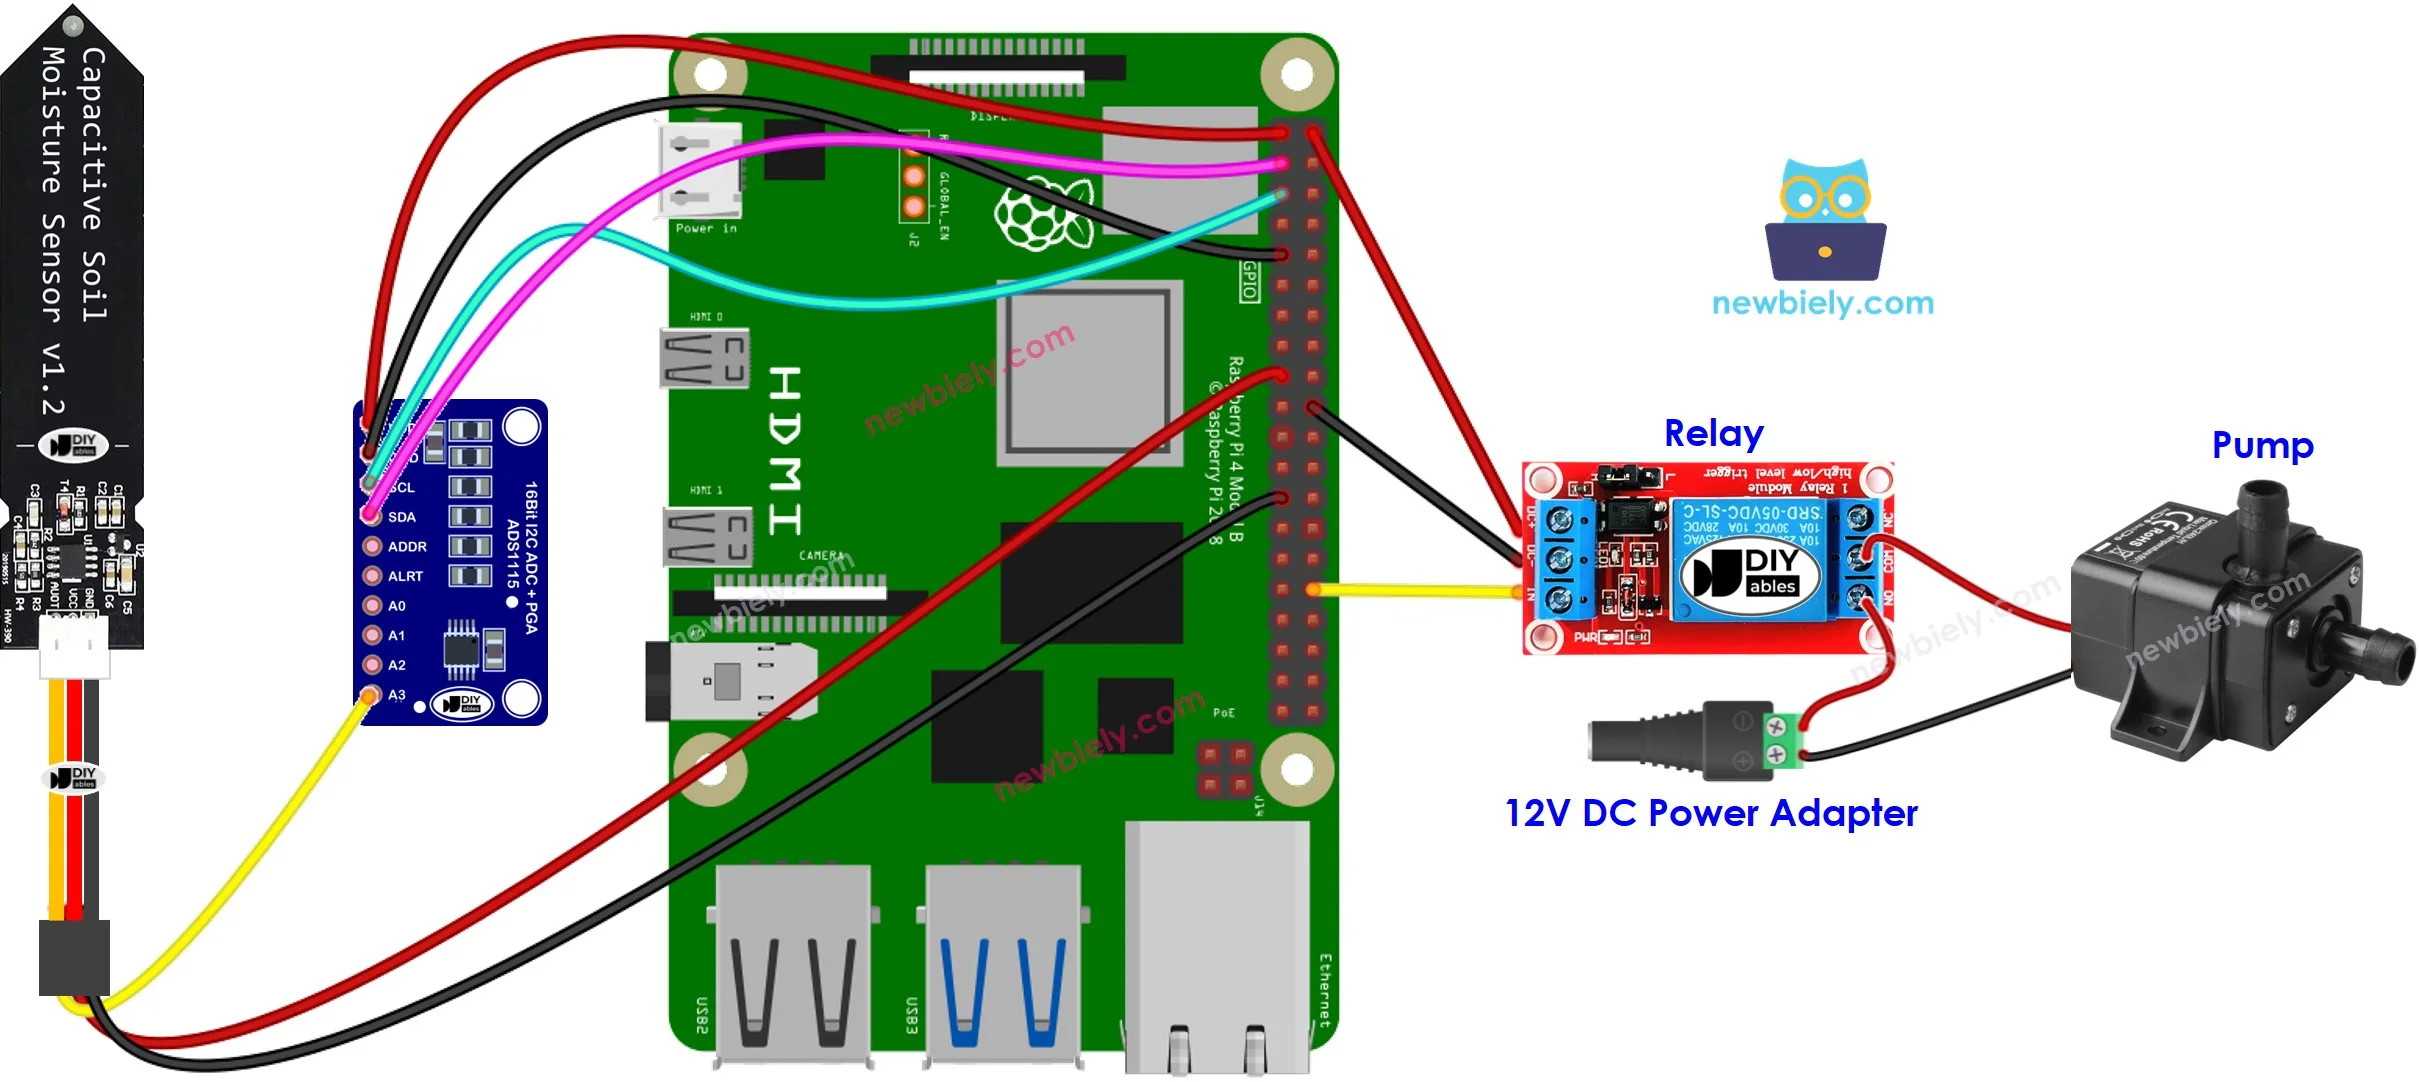
Connecting soil moisture sensors involves careful wiring to avoid incorrect readings and hardware damage. Since Raspberry Pi’s GPIO pins only handle digital input, you must use an ADC such as the MCP3008 to convert analog moisture sensor outputs into digital signals. Place the MCP3008 on a solderless breadboard, connecting its SPI interface pins to the Raspberry Pi’s SPI GPIO pins. Soil moisture sensor outputs connect to the ADC’s input channels.
Power the sensors using the 3.3V pin from the Raspberry Pi, routed through the breadboard. For temperature sensors like DS18B20, adding a 4.7k Ohm pull-up resistor between the 3.3V line and the GPIO signal pin is necessary for accurate readings. You can test your wiring with a multimeter or simple LED circuits before finalizing the installation.
Integrating Water Pumps and Valves
Water pumps used for irrigation often run on higher currents than the Raspberry Pi can supply. Instead of powering the pump directly from the Pi’s 5V pin, use a MOSFET relay or a power relay module connected to an external 5V power adapter. This approach allows the Raspberry Pi to control the pump safely by switching the relay on or off.
For example, when the soil moisture sensor indicates dry soil, the Raspberry Pi sends a signal to the relay to power the pump for a short watering period. Using durable relay modules designed for your pump’s voltage and current ratings prevents overload and protects your devices.
Water valves work similarly; they can be integrated with the relay setup to control water flow in different zones, making the system modular and scalable.
Power Supply and Safety Considerations
Safety is paramount when setting up electronic systems outdoors. Use an appropriate external power supply matched to your components’ voltage requirements. For instance, if your pump needs 5V, a regulated 5V power adapter with sufficient current capacity ensures stable operation. Avoid powering pumps or relays directly from the Raspberry Pi’s pins to prevent damage.
Enclosures for the Raspberry Pi and relay modules should be weatherproof to protect electronics from moisture. Additionally, carefully plan wiring routes to avoid water exposure and accidental disconnections. Adding fuses or circuit breakers in your power circuit is recommended to prevent electrical hazards.
Programming Your Raspberry Pi for Irrigation Control
Installing Necessary Libraries and Dependencies
Start by installing libraries that enable your Raspberry Pi to interact with sensors and output devices. For the MCP3008 ADC, you’ll need SPI support enabled on your Pi, which can be done via the command sudo raspi-config by activating SPI and, if using temperature sensors, the 1-Wire interface. Python libraries such as spidev or .NET IoT packages work well for managing GPIO and SPI communication.
Setting up your development environment may involve linking the Raspberry Pi remotely with tools like VSCode using the Remote SSH extension, which simplifies coding and debugging without constantly accessing the physical device.
Writing Code to Read Soil Moisture Data
Your program should regularly read analog moisture values from the MCP3008, convert them to meaningful moisture percentages, and determine if watering is necessary. Implementing a logging mechanism helps record sensor readings and watering events for troubleshooting and performance review.
For example, you could set the system to check moisture every four hours and activate the pump for four seconds if the soil falls below a specific threshold. Adjust these values based on your plants’ needs and local climate. Writing modular code makes adjustments easier as your garden grows or changes.
Automating Watering Schedules Based on Sensor Input
Include logic that triggers watering only when soil moisture is low, preventing overwatering. Scheduling scripts with cron jobs or system timers allows the Raspberry Pi to check sensors and control pumps autonomously at set intervals. This approach frees you from manual watering and ensures consistent irrigation tailored to real-time soil conditions.
In practice, one user reported success by creating a cron job that runs every 30 minutes to monitor sensor data and activate their pump and grow lights accordingly. This kind of automation keeps plants hydrated without wasting water or electricity.
Advanced Automation Techniques
Using Weather APIs to Optimize Irrigation
Integrating weather data into your system takes automation a step further. By connecting to weather APIs, your Raspberry Pi can adjust watering schedules based on forecasted rainfall or temperature changes. For instance, if rain is expected, the system can delay or skip watering cycles, conserving water and preventing soil oversaturation.
This dynamic approach is especially useful in regions with variable weather patterns, ensuring your garden always receives the right amount of water without constant monitoring.
Implementing Remote Monitoring and Notifications
Remote monitoring adds convenience and peace of mind. By sending soil moisture data and watering status to your smartphone or cloud service, you stay informed about your garden’s health from anywhere. Alerts can notify you if sensors fail, moisture drops dangerously low, or pumps malfunction.
This system could be as simple as a notification sent via email or text, or more advanced web dashboards with real-time graphs. Such feedback loops empower you to intervene quickly if issues arise, minimizing plant stress and avoiding system downtime.
Troubleshooting and Maintenance Tips
Common Issues with Sensors and How to Fix Them
One common problem is moisture sensors losing accuracy over time because soil minerals degrade their protective coatings. Choosing capacitive sensors helps, but regular cleaning or replacing sensors annually may still be necessary. Another frequent mistake is powering pumps directly from the Raspberry Pi’s 5V pin, causing overload or unpredictable behavior. Always use relays or MOSFET modules with an external power source for pumps.
Additionally, ensure your Raspberry Pi’s SPI and 1-Wire interfaces are enabled to communicate with ADCs and temperature sensors correctly. Without these settings, your system won’t read sensor data properly. Logging sensor data is invaluable for spotting anomalies—lack of logs can make diagnosing sensor failures frustrating.
Regular System Checks and Calibrations
Perform routine checks of wiring connections, sensor readings, and pump operation to maintain reliability. Soil moisture sensors may require recalibration if readings drift noticeably. Using test soil samples with known moisture levels can help verify sensor accuracy.
Watch for signs of electrical wear, such as corroded wires or overheated components, and replace parts as needed. Updating your software scripts periodically ensures compatibility with new Raspberry Pi OS versions and improves automation logic based on your garden’s evolving demands.
Conclusion and Next Steps
Automating your garden irrigation with a Raspberry Pi and soil moisture sensors offers a practical, efficient, and cost-effective way to enhance plant care. By carefully selecting durable components, setting up hardware with safety in mind, and programming intelligent control logic, you create a system that saves time, water, and effort.
As you gain experience, consider advancing your setup with weather integration and remote monitoring for smarter, connected gardening. Remember that regular maintenance and thoughtful troubleshooting keep your system running smoothly season after season. Start today by assessing your garden’s needs and gradually build your automated irrigation tailored precisely for your plants.


